Create a Custom Color Palette in Affinity Designer
Coming up with a harmonious color palette for a project can be a daunting task - even for seasoned professionals.
Fortunately, (in the digital realm at least) there are several ways to quickly and easily build one. The method I’m going over today extracts colors from your favorite photo.
Why a favorite photo? Oftentimes, the blend of colors is one of the reasons why someone favors one picture over another.

First, fire up Affinity Designer and open a favorite photo.

Next, click on the Swatches tab. (If you don’t see it, go to View (main menu bar near the top) > Studio > ensure Swatches is checked.)
Click on the stacked white lines in the upper right corner of the Swatches tab.
Choose Create Palette From Document.
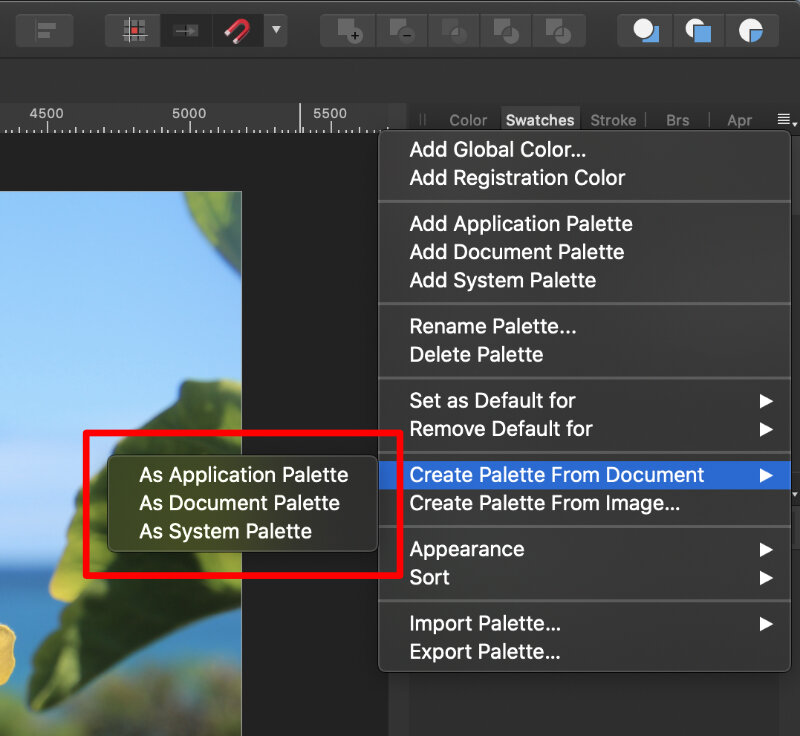
You will have three options:
Application Palette will make this palette available in Affinity Designer, regardless of what file you have open. (I typically choose this option since I will create a new document from scratch after.)
Document Palette will make this palette available on for the file that is currently opened.
System Palette will make this palette available in other applications, like Affinity Photo.
Choose the option best for you.

After clicking which palette type you want, Affinity Designer will create a palette based on the photo you have open.
Enjoy your new custom palette!
Method #2
Alternatively, there’s another way to do the same thing with more control and without having to open your photo.
Without having a file open in Affinity Designer, go to Swatches > white stacked lines > but now choose Create Palette From Image.
Affinity Designer will prompt you for:
an image (select your favorite photo),
how many colors you want extracted,
and what type of palette (Application, System, Document).